GUIDE // CHART BREAKDOWNS
The Hardest Charts in In Falsus, Frame by Frame
The hidden FBD 15 · five FBD 14 charts · Enigma FBD 13 · the FBD 12 tier
The demo's answer to "how hard does this get?" was à la mode FBD 11. The full game rewrote it: fourteen charts share FBD 13 — Enigma among them — twenty-four sit at FBD 12, and the complete catalog climbs past both, to five charts at FBD 14 and a hidden track at FBD 15. This page now walks the whole ladder frame by frame, from the FBD 15 wall down to the demo ceiling.
Quick Takeaways
- ▸The hidden Arc 4 track '▓' is In Falsus's only FBD 15 chart — 3,108 judgments on its result screen, the largest documented count in the game, and no public clear as of September 2026.
- ▸FBD 14 is a five-chart tier — Chronophobia, code:Leviathan, Hollow, PhylaXron and TACTOM. code:Leviathan's documented Anomaly run dies at MISS GAUGE -13; poke's First Clear proves the chart falls.
- ▸Enigma is one of fourteen FBD 13 charts, and FBD 12 is a twenty-four-chart tier spanning every arc — the launch-era summit this guide started with.
- ▸The demo-era peaks are unchanged — à la mode FBD 11, Ordirehv FBD 10, Ghost Ray ULT 8 — so every hour of demo practice still counts.
Source Footage
Frames in this guide come from seven videos: Kyrosol's FBD chart previews of Enigma and Sin Utopia, DJwarlock's Ordirehv FBD 10 Full Link EX+ and à la mode FBD 11 AA clear, ChepFrosty's Ghost Ray ULT tips run, and Seol's Anomaly-state runs of code:Leviathan FBD 14 and the hidden FBD 15 chart. Every frame links back to the exact moment it was taken.
Perfect Dive runs worth watchingThree more runs matter. EKRuby's Ordirehv FBD 10 and BlueDiamond091's à la mode FBD 11 Perfect Dives are room-handcam or overlay edits, so no frames are reused — they are the proof that all-EXACT clears of those charts exist. poke's code:Leviathan FBD 14 First Clear (093'302'323, rank A) carries a handcam picture-in-picture, and Ironfork's FBD 15 chart view ends in the same DIVE FAILED as our featured run — both are credited rather than framed.↗ EKRuby — Ordirehv FBD 10 Perfect Dive↗ BlueDiamond091 — à la mode FBD 11 Perfect Dive (Max-58)↗ poke — code:Leviathan FBD 14 First Clear (rank A)↗ Ironfork — FBD 15 chart view (DIVE FAILED)
Enigma FBD 13 — the Launch-Week Summit
sanmal · Arc 2 · an FBD 13 chartEnigma is where the full game redrew the ceiling. The Arc 2 track by sanmal carries one of the game's fourteen FBD 13 charts — a full level above anything the demo showed. Even in chart preview the play field turns into crossing laser walls, and the density keeps climbing into the final third.
- 1
Find it: the 13 badge in song select
Enigma sits in the Arc 2 track group. Its select card carries the number 13 next to the FORBIDDEN tab — one of just three 13s in the game, a clear level above the demo's à la mode at 11.
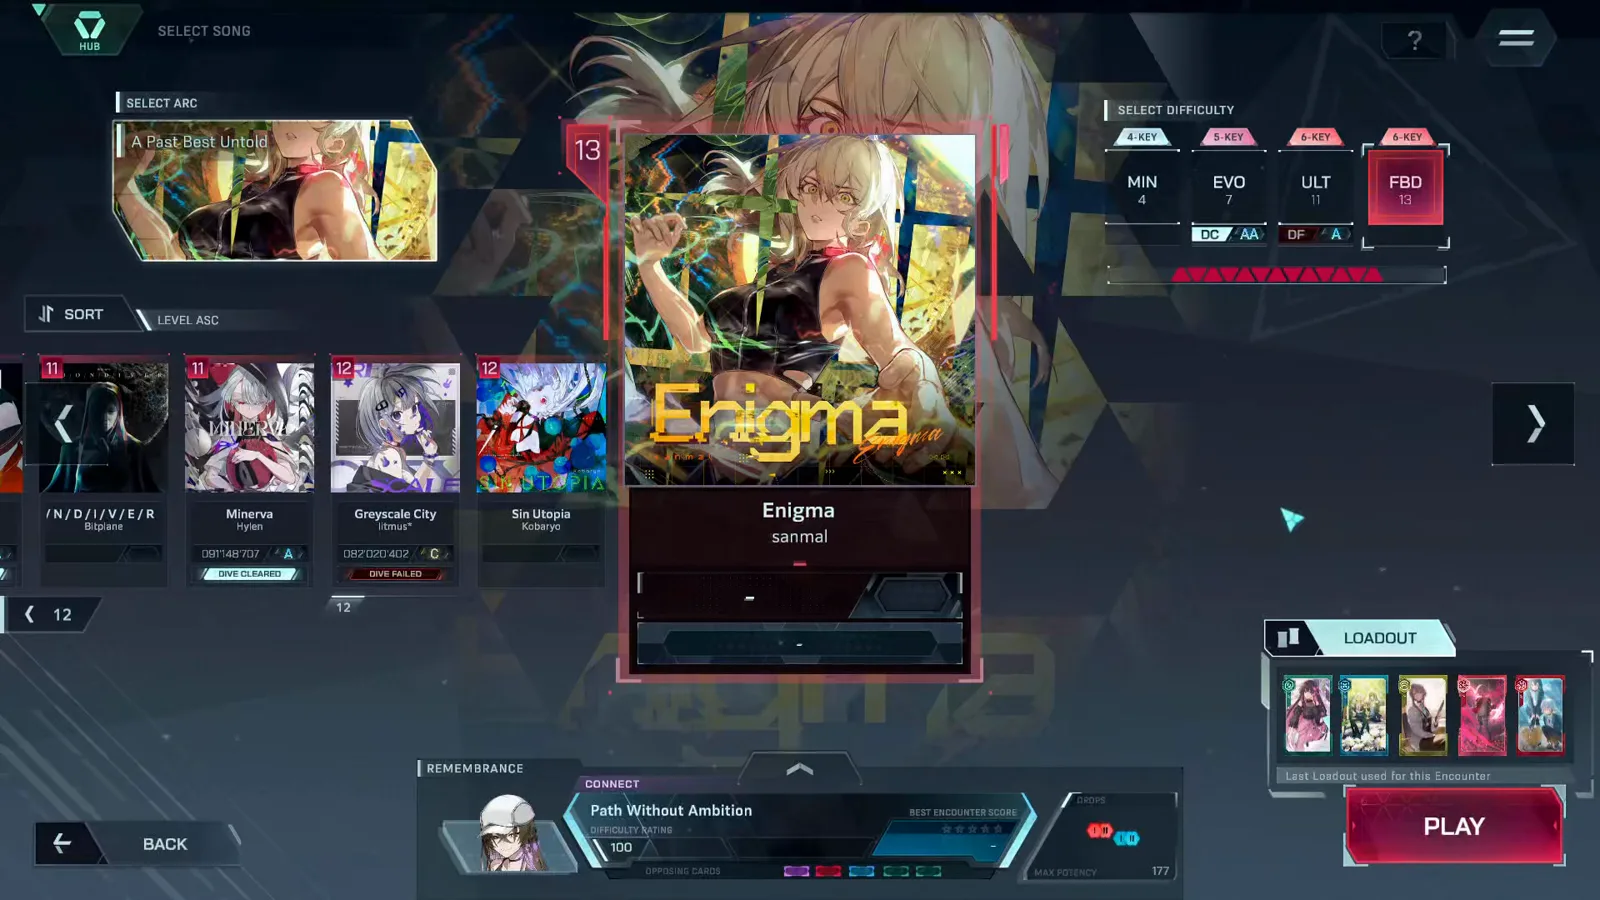
Level 13 on the card: only two other charts in the game reach this number. · Footage: Kyrosol ↗ - 2
Read the crossing lasers
Mid-chart, two laser traces cut across the field at once — purple against pink — while lane notes keep landing underneath. The crossings are the exam: each trace owns a line, and your cursor owes both.
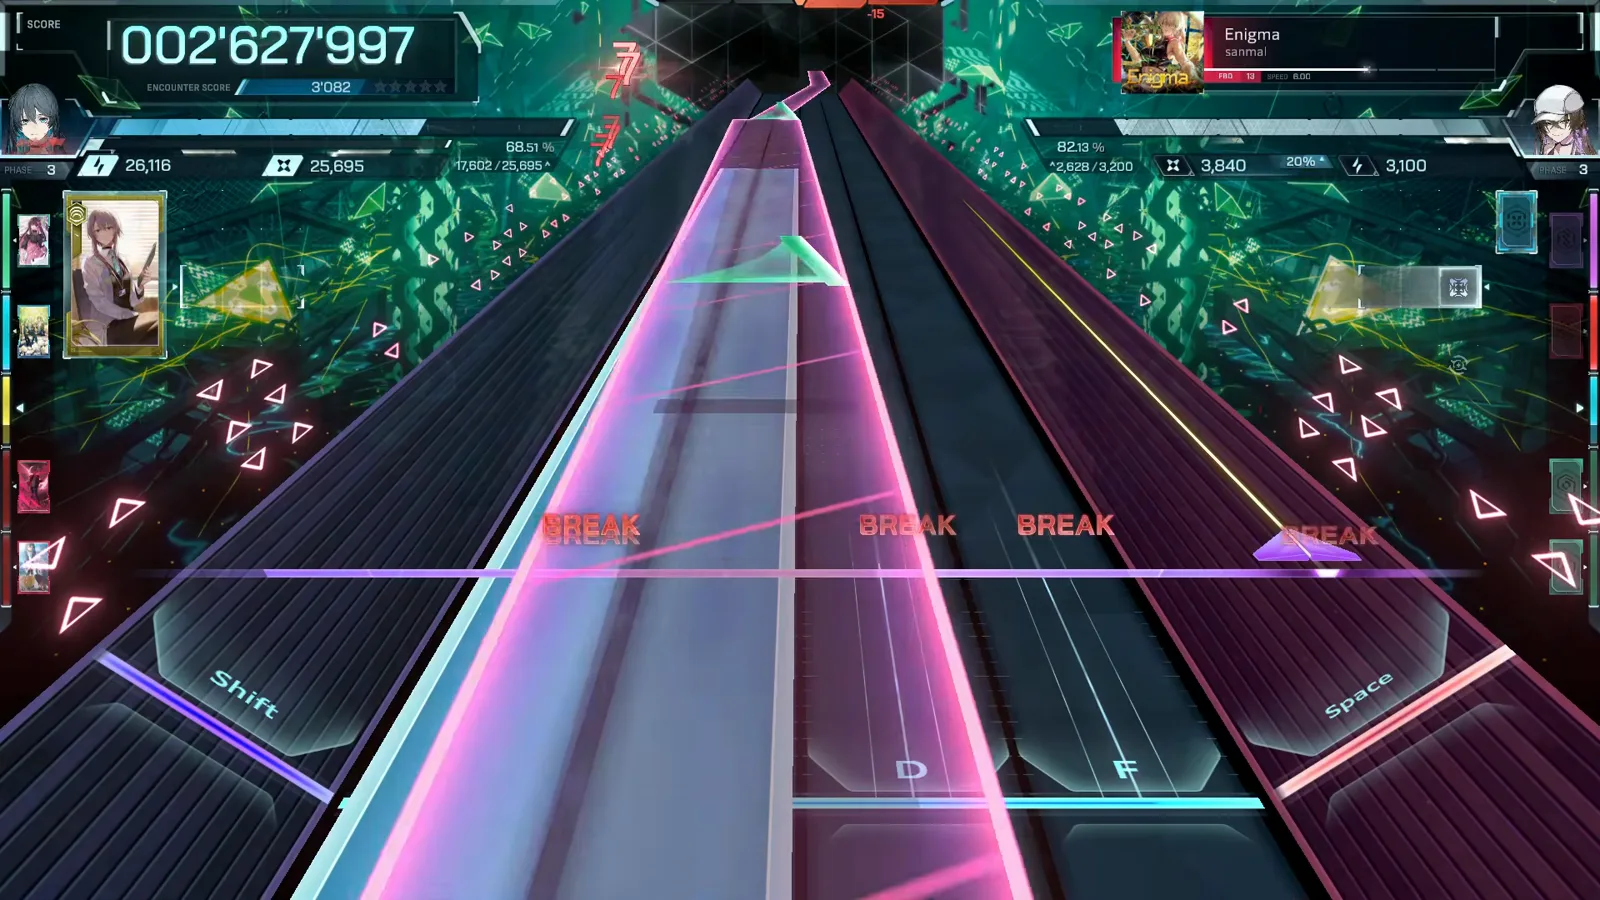
Two traces, two lines, one cursor — the defining shape of FBD 13. · Footage: Kyrosol ↗ - 3
Survive the diagonal sweep
Late in the chart a broad translucent trace cuts diagonally over nearly every lane at once. It rewards a planned entry point over reaction — decide where you will meet it before it arrives.
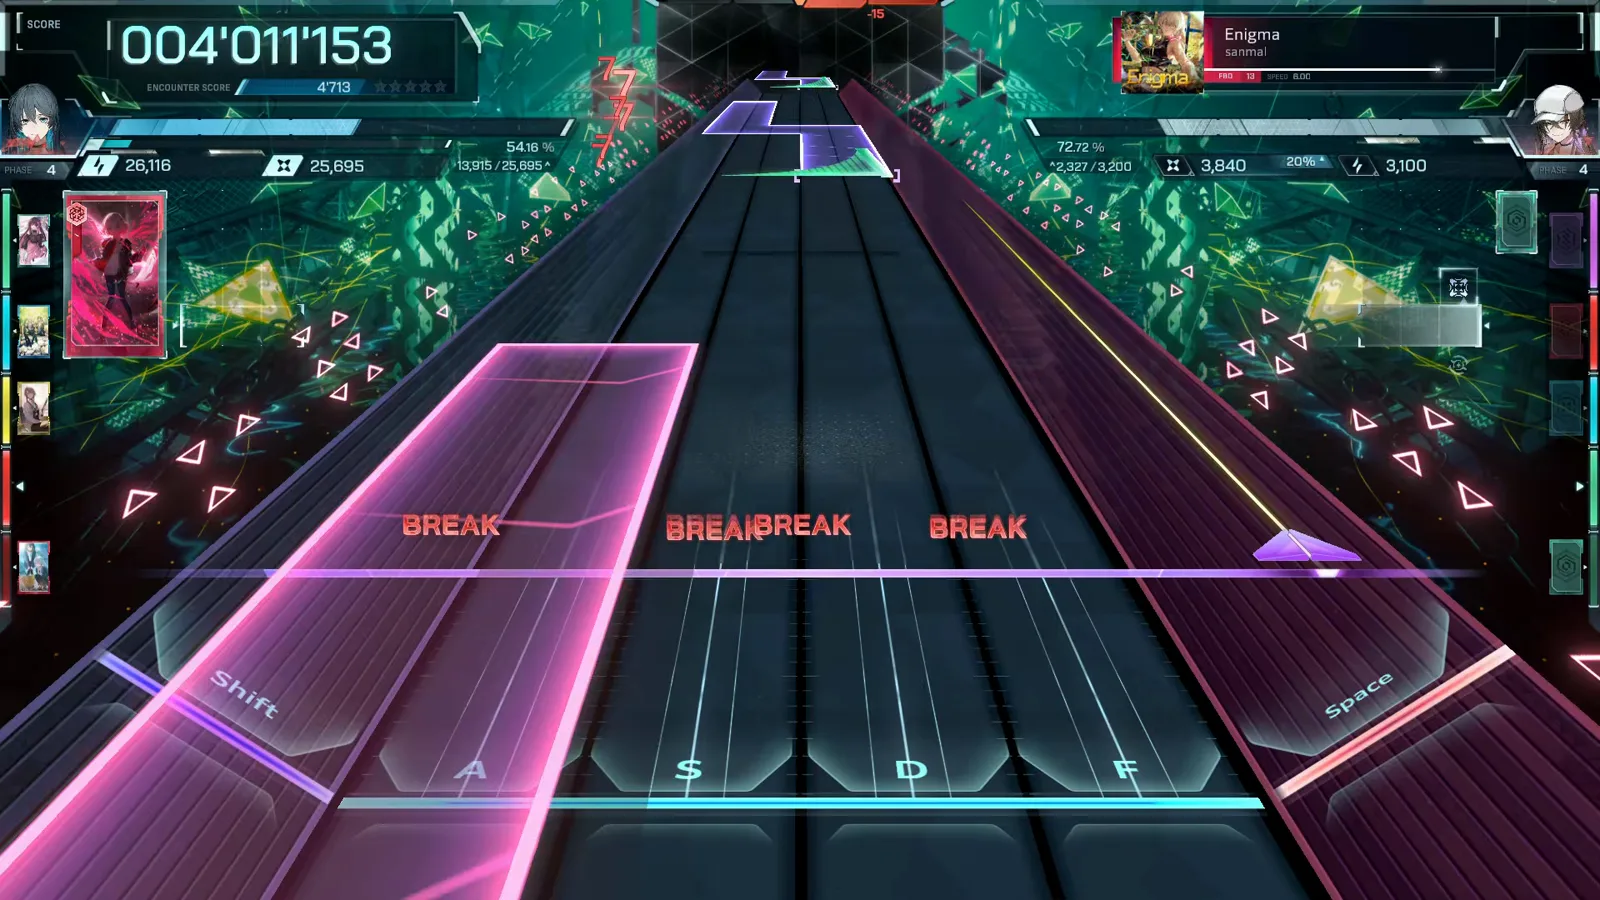
One sweep, most of the field — plan the entry, don't chase it. · Footage: Kyrosol ↗
Sin Utopia FBD 12 — the Face of the FBD 12 Tier
Kobaryo · Arc 2 · FBD 12Twenty-four charts share level 12, and Sin Utopia is the one to meet first. Kobaryo's Arc 2 track runs crossing laser streams and a full-field sweep that previews exactly what the tier demands: constant trace reading over dense lane work.
- 4
The tier, not a song
FBD 12 is a tier of twenty-four, spanning every arc: Sin Utopia and Greyscale City here in Arc 2, ZFC, Be There, Cyaegha and MIRINAE elsewhere, Cylin and Lights Out in Arc 2.5, My Deadly Sins, Self-confrontatioN and yggthrasir in Arc 3 — plus Hyaloüyne and Deep Into The Vibe, two demo songs that gained FBD charts at launch, and eleven more charts the complete tracklist added after launch.
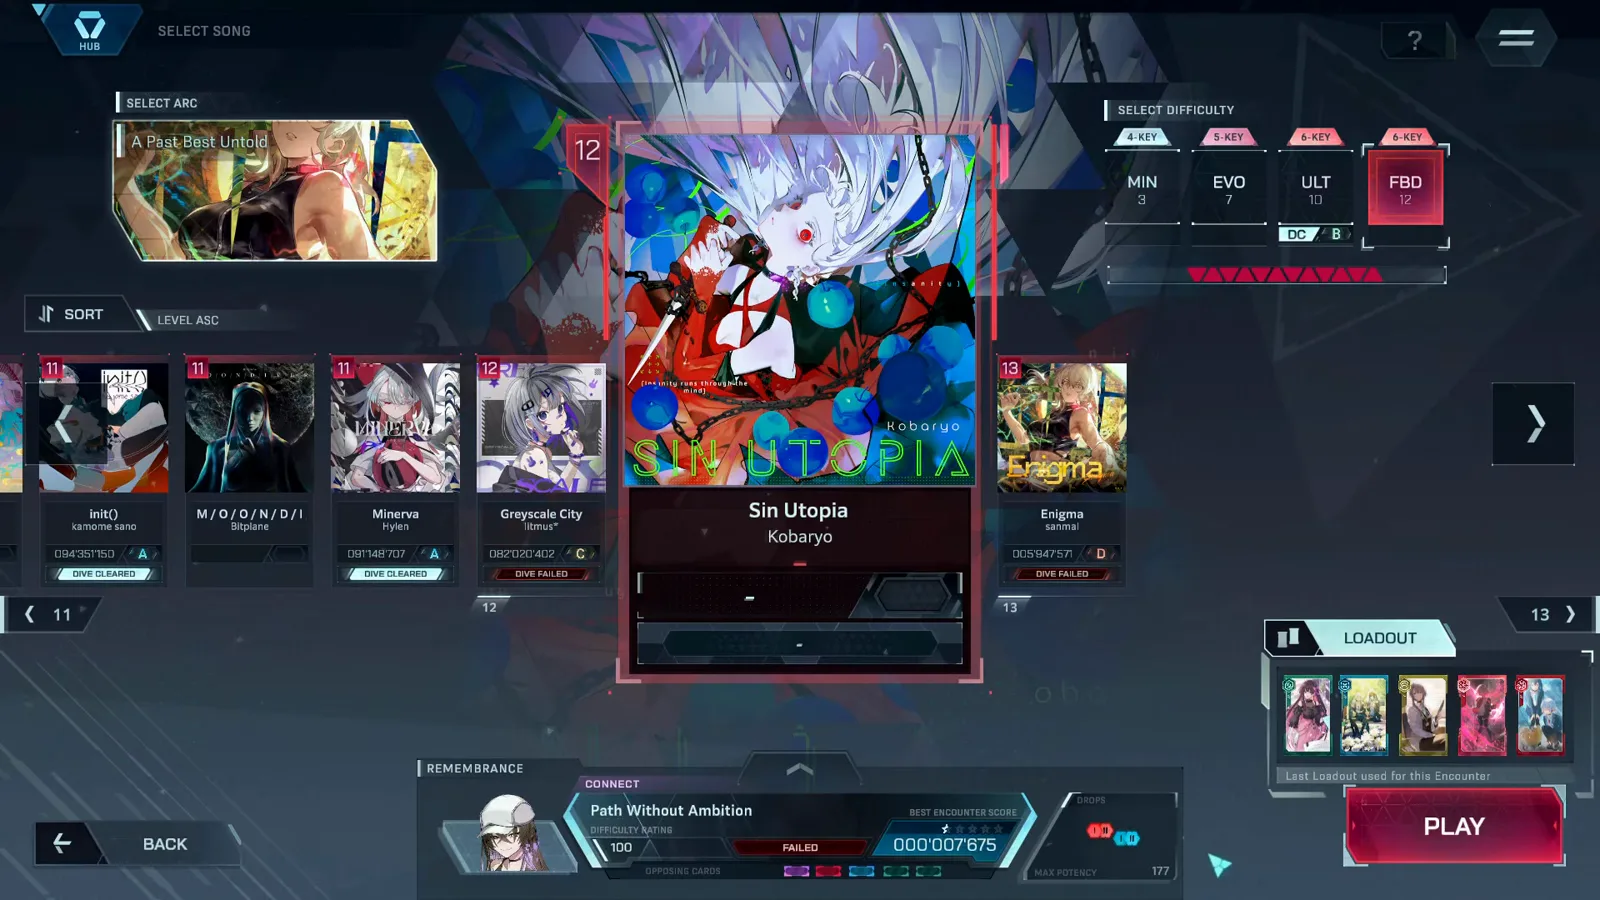
One tab beyond ULT: level 12, shared by twenty-four charts. · Footage: Kyrosol ↗ - 5
Crossing streams under pressure
Sin Utopia's midsection runs purple and cyan lasers across the field while the lane notes refuse to thin out. Where Ordirehv examined cursor control, this tier assumes it and adds speed.
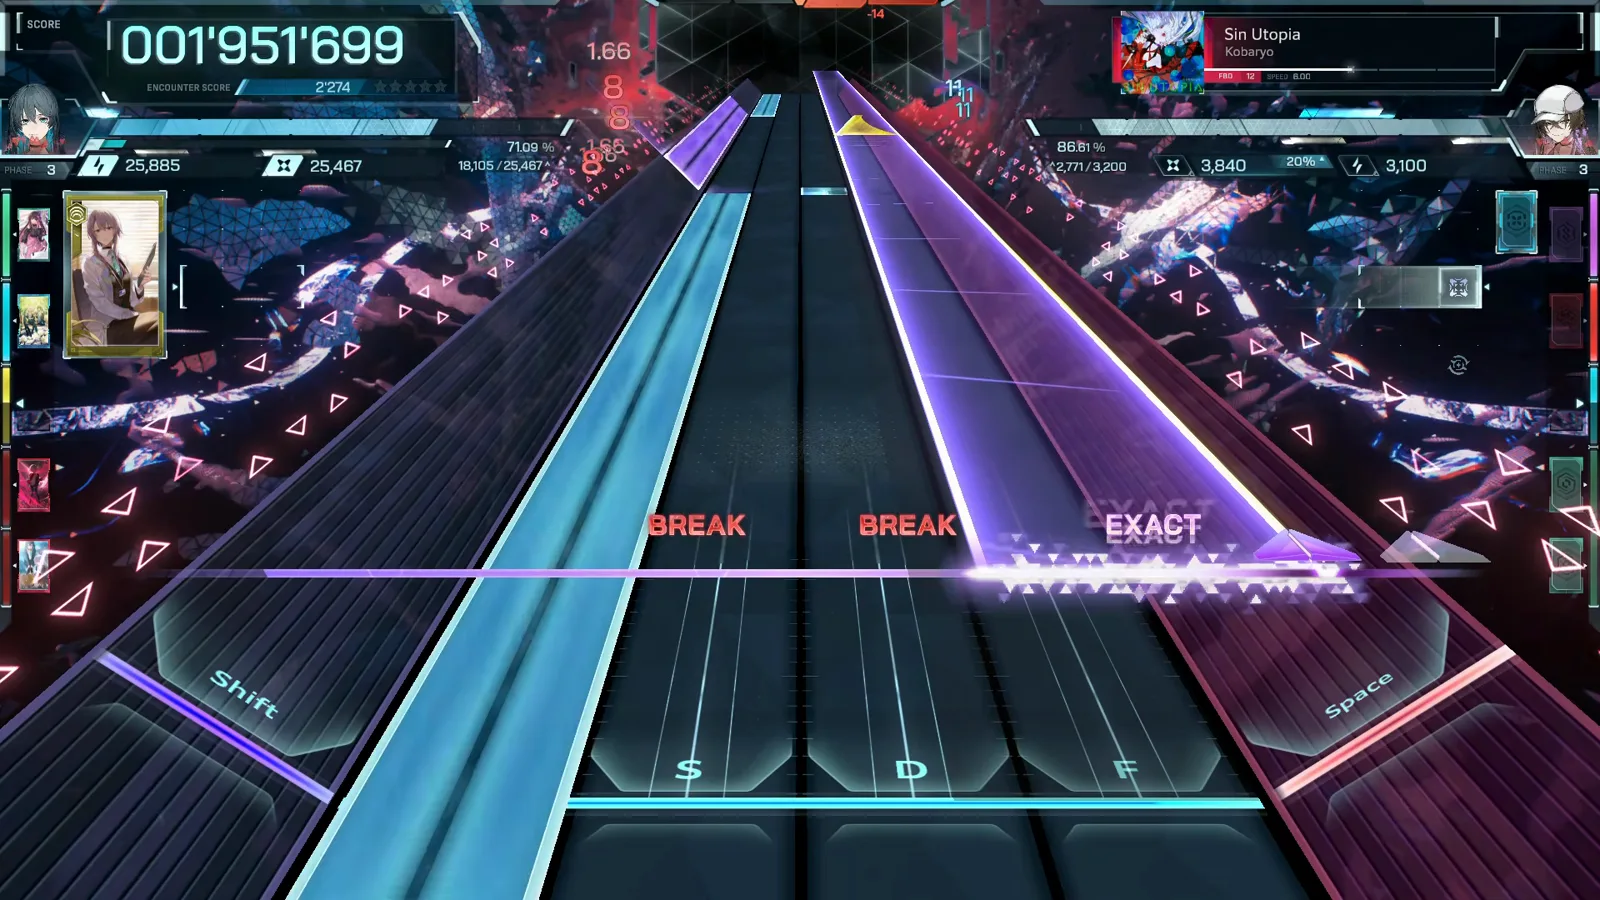
The wall of light: FBD 12 assumes Ordirehv's exam is already passed. · Footage: Kyrosol ↗ - 6
Ride the full-field sweep
A wide pink trace bends an S-curve across the whole field. Like Enigma's finale it covers more ground than a reaction can cover — pick your entry edge and stay with it.
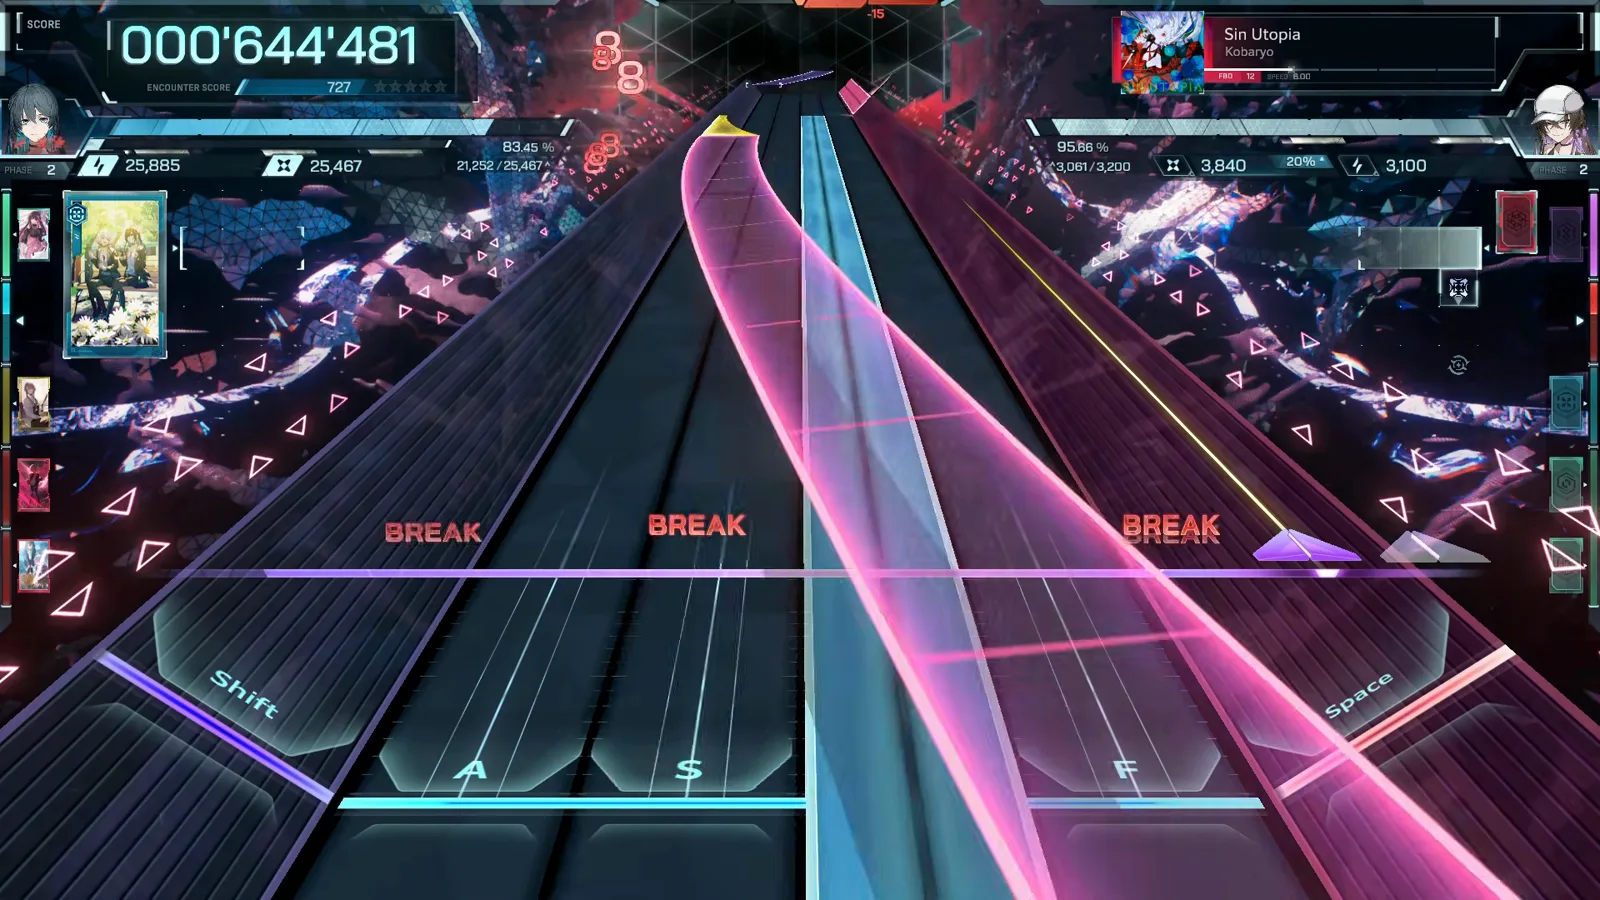
The S-curve crosses everything; commit to an edge and ride it. · Footage: Kyrosol ↗
à la mode FBD 11 — the Old Ceiling, Still Standing
aran · FBD 11 · the demo's former peakà la mode is the only level-11 chart in the demo, and it plays like it: sustained lane streams, Field curves layered over flick arrows, and a late-chart cyan Field zone that swallows the center lanes. DJwarlock's AA clear still records 52 NEAR and 16 BREAK — a realistic picture of what a first clear looks like. BlueDiamond091's Perfect Dive (Max-58) proves the ceiling. Full chart data is on the à la mode song page.
- 7
Warm up on the opening lane streams
à la mode opens with honest six-lane work — single notes and short bursts across the highway with the FBD 11 badge overhead. Use it to lock your timing in; the chart stops being this forgiving quickly.

The calmest à la mode gets: clean six-lane streams under the FBD 11 badge. · Footage: DJwarlock ↗ - 8
Split your attention: Field curve plus flick arrows
The first real wall layers a purple Field curve over the lanes while a green flick arrow floats above the judgement line. Hit the flick with a small cursor twitch — a couple of pixels is enough — without drifting off the Field ribbon.

The first real wall: a Field ribbon to hold while a flick arrow demands a cursor twitch. · Footage: DJwarlock ↗ - 9
Ride the wide cyan Field zone
Late in the chart a cyan Field zone expands to cover the center lanes while EXACT popups chain along it. The required cursor motion is smaller and slower than the visuals suggest — stay on the inner edge of the zone so a slip leaves you room to correct.

The late-chart cyan Field zone swallowing the center lanes — smaller motions than it looks. · Footage: DJwarlock ↗ - 10
Accept what a first clear costs
DJwarlock's AA result: DIVE CLEARED with 923 EXACT plus 107 shiny, 52 NEAR and 16 BREAK, max link 238. On a level-11 chart, dropping links in the hard sections and surviving is a legitimate clear — the MSS gauge only needs to hold at 10 or above.

A realistic first clear: AA with 52 NEAR and 16 BREAK, DIVE CLEARED all the same. · Footage: DJwarlock ↗
Ordirehv FBD 10 — the Field-Curve Exam
Feryquitous · FBD 10 · cleared EX+ Full Link on cameraOrdirehv is the demo's discipline check for the mouse hand. Where other charts spike with lane density, Ordirehv floods the highway with Field ribbons — two at once in the mid-chart, four stacked in the late section — while the lanes themselves stay readable. DJwarlock's Full Link EX+ run ends with just 12 NEAR and 0 BREAK, which tells you where the difficulty lives: drop the cursor off a ribbon and the link is gone. Full chart data and counters are on the Ordirehv song page.
- 11
Read the opening Field ribbon early
Ordirehv opens by putting a purple Field ribbon straight down the center lane while single lane notes tap underneath. Pick the ribbon up with the cursor as soon as it renders — Field notes only judge shiny EXACT or miss, so a late entry is already a drop.

Ordirehv wastes no time: a center-lane Field ribbon with lane taps underneath, seconds into the chart. · Footage: DJwarlock ↗ - 12
Track two Field zones at once
Mid-chart, Ordirehv runs a purple Field curve through the middle lanes and a pink one down the right side simultaneously. The lane hand plays simple taps while the cursor hand sweeps both zones; the EXACT popups on both ribbons show the run never drops either one.

The mid-chart signature: two Field ribbons active at once, both flashing EXACT. · Footage: DJwarlock ↗ - 13
Survive the stacked-ribbon finale
The late section stacks four Field ribbons — purple pair on the left, purple center, pink right — over the highway at once. This is the chart's wall: keep the cursor moving in small, controlled arcs instead of chasing each ribbon edge to edge.

Four Field ribbons on screen at once — the moment that ends most Full Link attempts. · Footage: DJwarlock ↗ - 14
Know what the clear looks like
DJwarlock's result screen: rank EX+ with FULL LINK, 1,163 EXACT plus 67 shiny EXACT, 12 NEAR and 0 BREAK, max link 1,242. You do not need a Perfect Dive for the top rank here — but you cannot afford a single BREAK.

EX+ with FULL LINK: 12 NEAR, 0 BREAK, max link 1,242. No Perfect Dive required for the top rank. · Footage: DJwarlock ↗
Ghost Ray ULT — Flicks and Field Discipline
Qlarabelle & crayvxn · ULT 8 · Perfect Dive on cameraGhost Ray's ULT chart (level 8 in the demo, below its FBD 10) is the chart ChepFrosty chose for a tips video, because it drills the two skills the whole game grades hardest: tiny, accurate flick motions and never leaving a Field note. His run ends in a Perfect Dive — 0 NEAR, 0 BREAK — and his overlay advice is paraphrased into the steps below. Full chart data is on the Ghost Ray song page.
- 15
Let note colors call your fingers
Ghost Ray's early section mixes a purple Field ribbon with green flicks and lane taps. ChepFrosty's core advice: use note color as a shorthand for which finger plays it — purple patterns go to the pinky side, blue to the middle fingers, red toward the thumb — so your lane hand never has to think.

Ghost Ray's vocabulary in one frame: Field ribbon, green flick, lane taps. · Footage: ChepFrosty ↗ - 16
Flick with pixels, not swipes
The flick burst fires yellow beams at the bottom of the highway while a hold note runs above. Flicks in In Falsus have their own, more lenient timing windows and only need a small twitch in the right direction — over-swiping just throws your cursor off the next Field note.

Yellow flick beams at the line — each one wants a couple of pixels, not a swipe. · Footage: ChepFrosty ↗ - 17
Take the wide sweep from the inner edge
Ghost Ray's wide purple Field sweep crosses the whole highway. Enter it with a small initial motion to feel the rhythm and confirm your cursor position, then ride the inner edge — if the cursor slips out, you have less distance to recover, and the grace before a miss is tiny.

Ride this sweep from the inner edge; the grace before a Field miss is tiny. · Footage: ChepFrosty ↗ - 18
Hold the link to the final note
The run ends with the CONNECTED banner at a score of 100'001'061 — every note linked, encounter won. On Ghost Ray the danger is never one huge wall; it is a hundred small chances to leave a Field note or over-flick.

Every note linked: CONNECTED at 100'001'061 as the chart empties out. · Footage: ChepFrosty ↗ - 19
Read a Perfect Dive result
ChepFrosty's result screen: PERFECT DIVE with 1,061 EXACT plus 15 shiny EXACT, 0 NEAR, 0 BREAK and a max link of 1,076 on the ULT chart. That is the all-shiny ideal this guide's technique points at.

PERFECT DIVE on the ULT chart: 0 NEAR, 0 BREAK, max link 1,076. · Footage: ChepFrosty ↗
code:Leviathan FBD 14 — the Anomaly Wall
kanone · Arc 3 · one of five FBD 14 chartsFBD 14 is where the catalog leaves the launch-era summit behind: five charts — Chronophobia, code:Leviathan, Hollow, PhylaXron and TACTOM — and, at time of writing, only one documented clear among them. code:Leviathan is the wall we can show you. Seol's run plays it under the red Anomaly state flagged in the upload's title, holds the dive to the final seconds, and dies at MISS GAUGE -13; poke's separate First Clear (linked below) proves the chart does fall. The catalog's FBD note split isn't documented yet — the run's result screen counts 2,433 judgments.
- 20
Read the chart through the Anomaly filter
Seol's upload plays code:Leviathan under the Anomaly state — the corrupted red wash over the whole highway. The chart underneath is readable anyway: a curved purple Field beam riding over steady lane streams, with the EXACT row confirming the timing window stays honest through the filter.
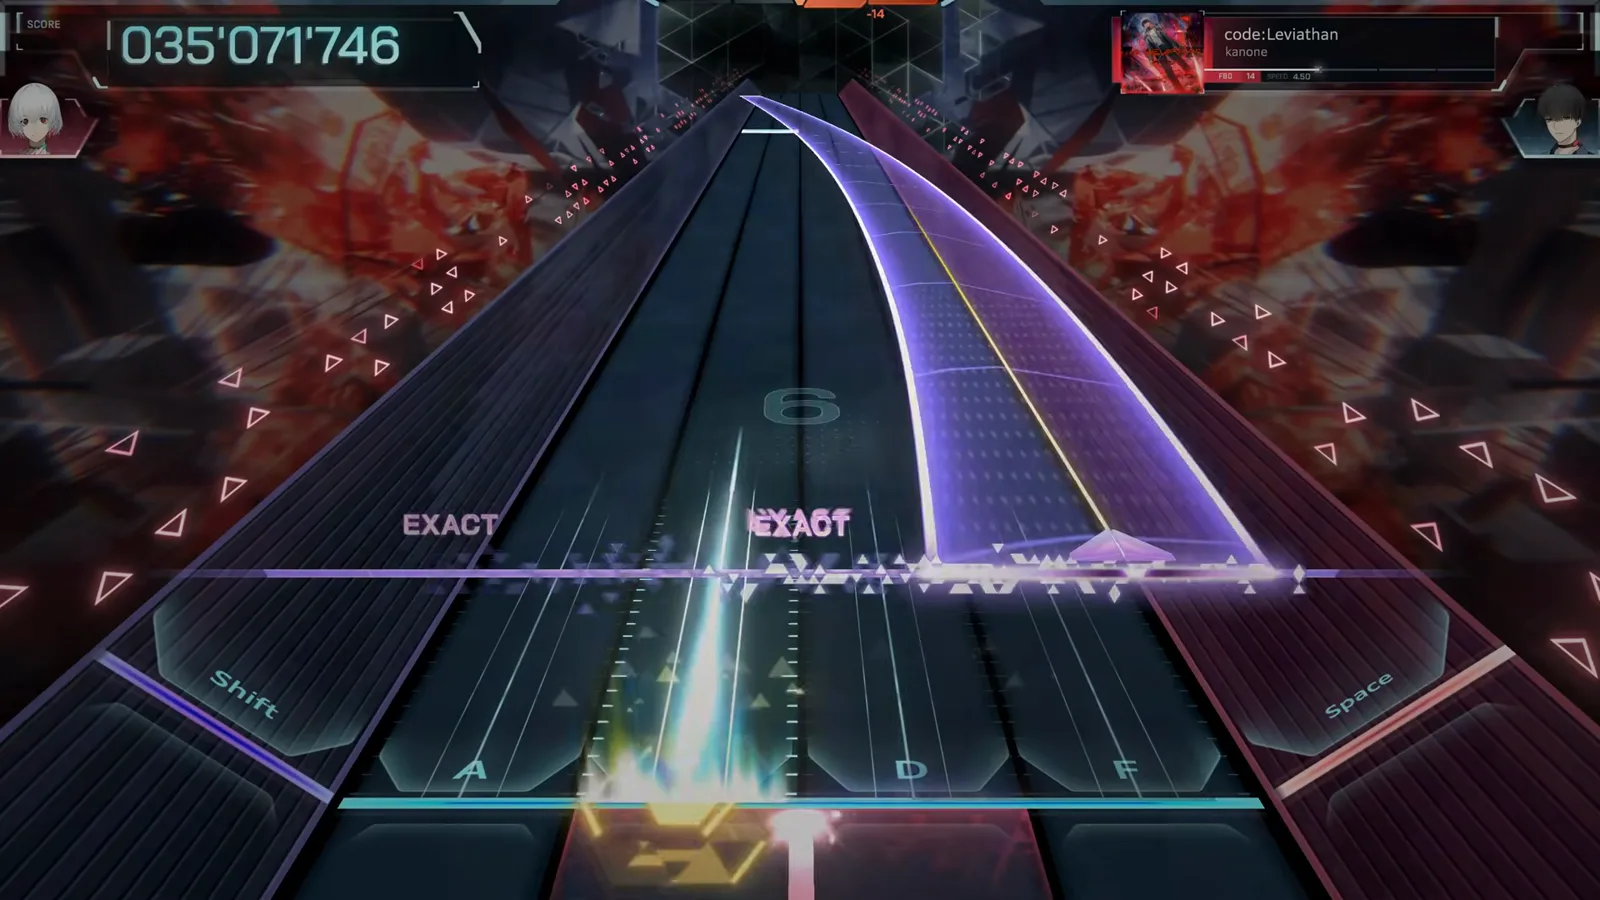
FBD 14 ATTEMPT · 1:20 ANOMALY WALL · Seol — code:Leviathan FBD 14 (Anomaly) ↗ - 21
Where the gauge dies: the late-chart double wall
Past the 60-million mark the chart stacks a BREAK-streaked stream wall over crossing holds — this is the stretch that killed the featured run. The result screen later admits 216 BREAKs against a MAX LINK of 269 and a MISS GAUGE of -13: close enough to taste the clear, not enough to land it.
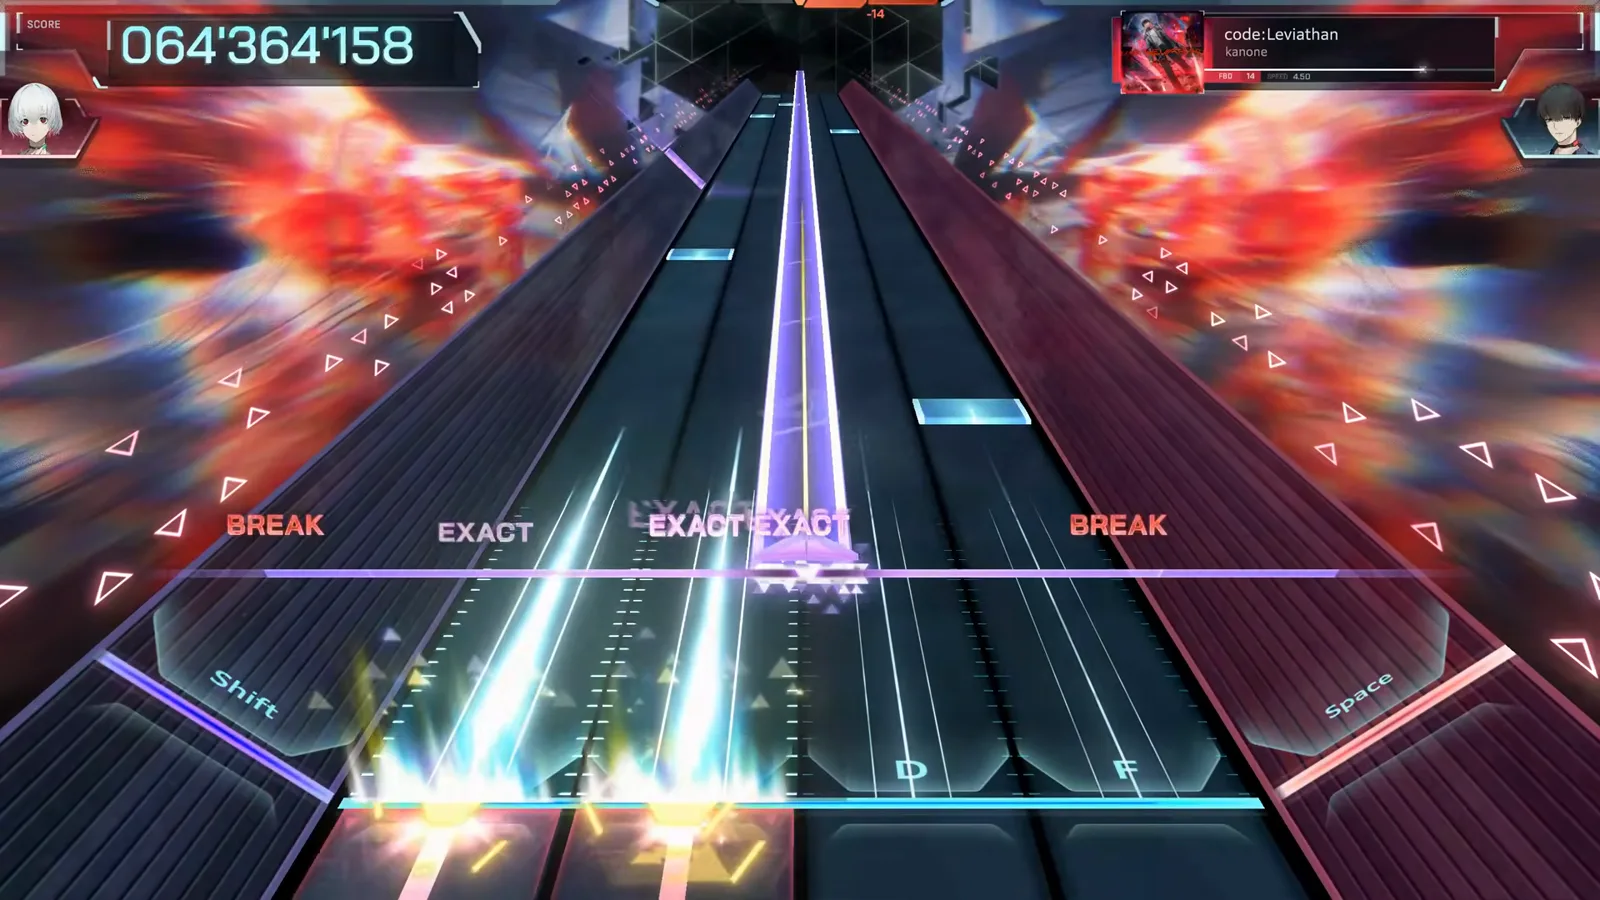
FBD 14 ATTEMPT · 2:20 GAUGE DRAIN · Seol — code:Leviathan FBD 14 (Anomaly) ↗
The FBD 15 Wall — '▓' (tokonagi)
∞ · Arc 4 · the only FBD 15 chartThe game's ceiling wears a mask: the song select lists it under the blocked-out title '▓', the artist field reads simply ∞, and the community knows it as tokonagi. Its FBD 15 is the only one in the game, and the difficulty shows — Seol's attempt and Ironfork's chart view both end in DIVE FAILED, and no public clear had surfaced when this page was last checked (2026-09-18). What the attempt does document is scale: 3,108 judgments on the result screen, the largest count in the catalog.
- 22
Full-width sweeps under the mask
Even the mid-chart is wide: a purple Field sweep crosses the full highway while four lane streams run underneath it. This is the tier where nothing stays in one lane for long — the FBD 13 charts' crossing beams are the warm-up act here.
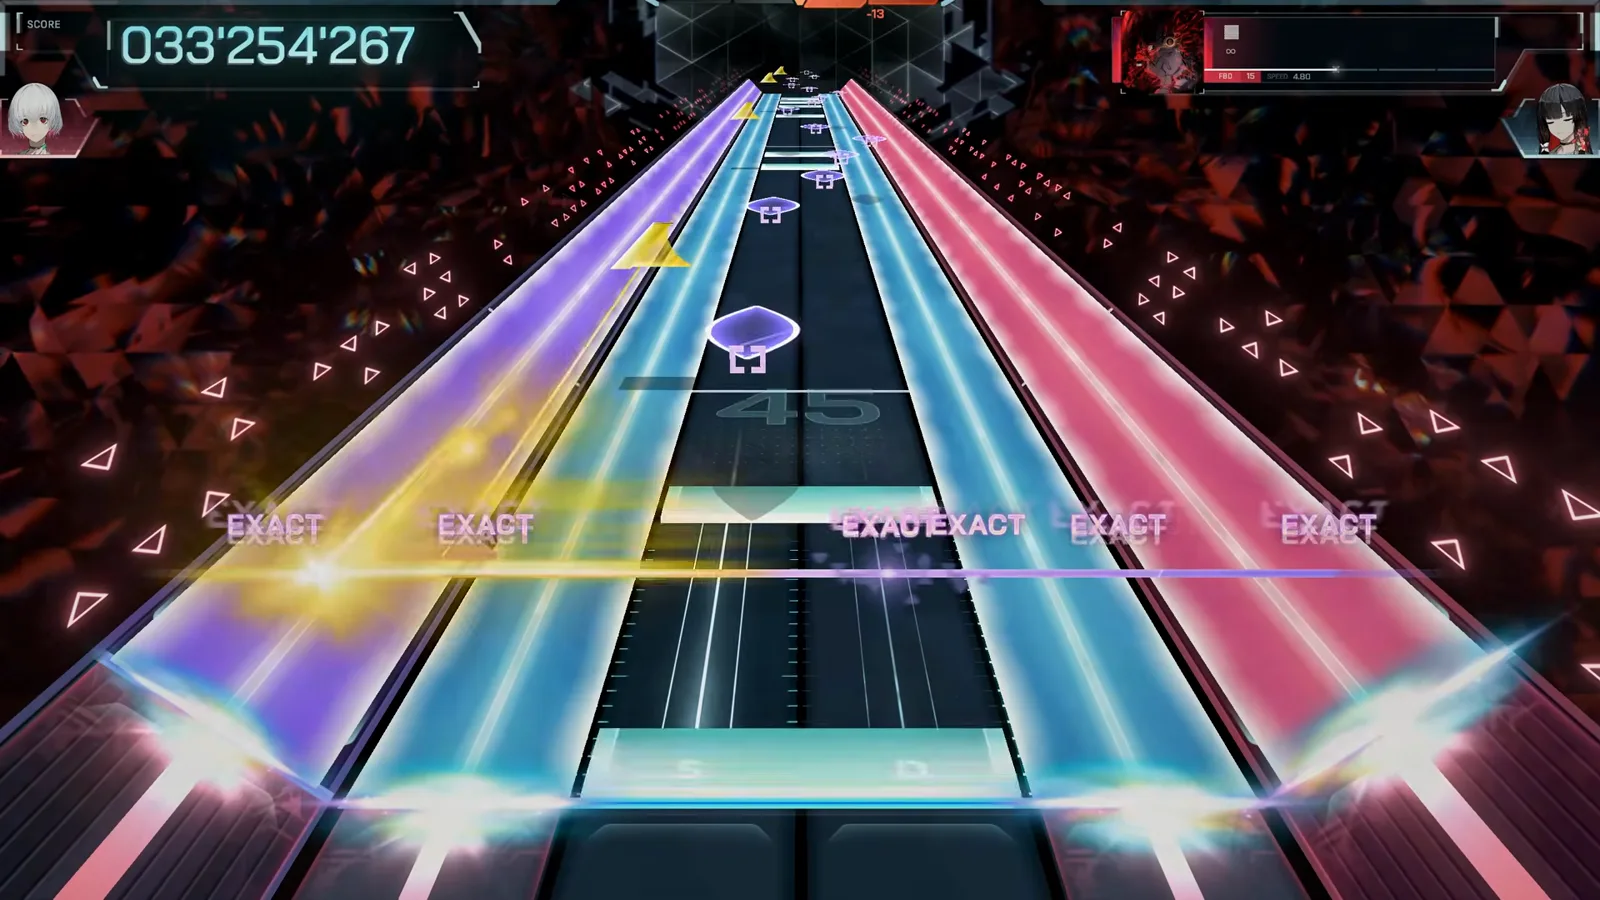
FBD 15 ATTEMPT · 1:20 THE MASKED CHART · Seol — '▓' FBD 15 attempt ↗ - 23
The quad-beam finale wall
The last stretch stacks four beams over hexagonal hold rings, with the MISS GAUGE already flashing. Seol's run carries an EARLY/NEAR/BREAK mix through this wall — the section where the 14-chart FBD 13 tier ends and the reason there is only one FBD 15 begins.
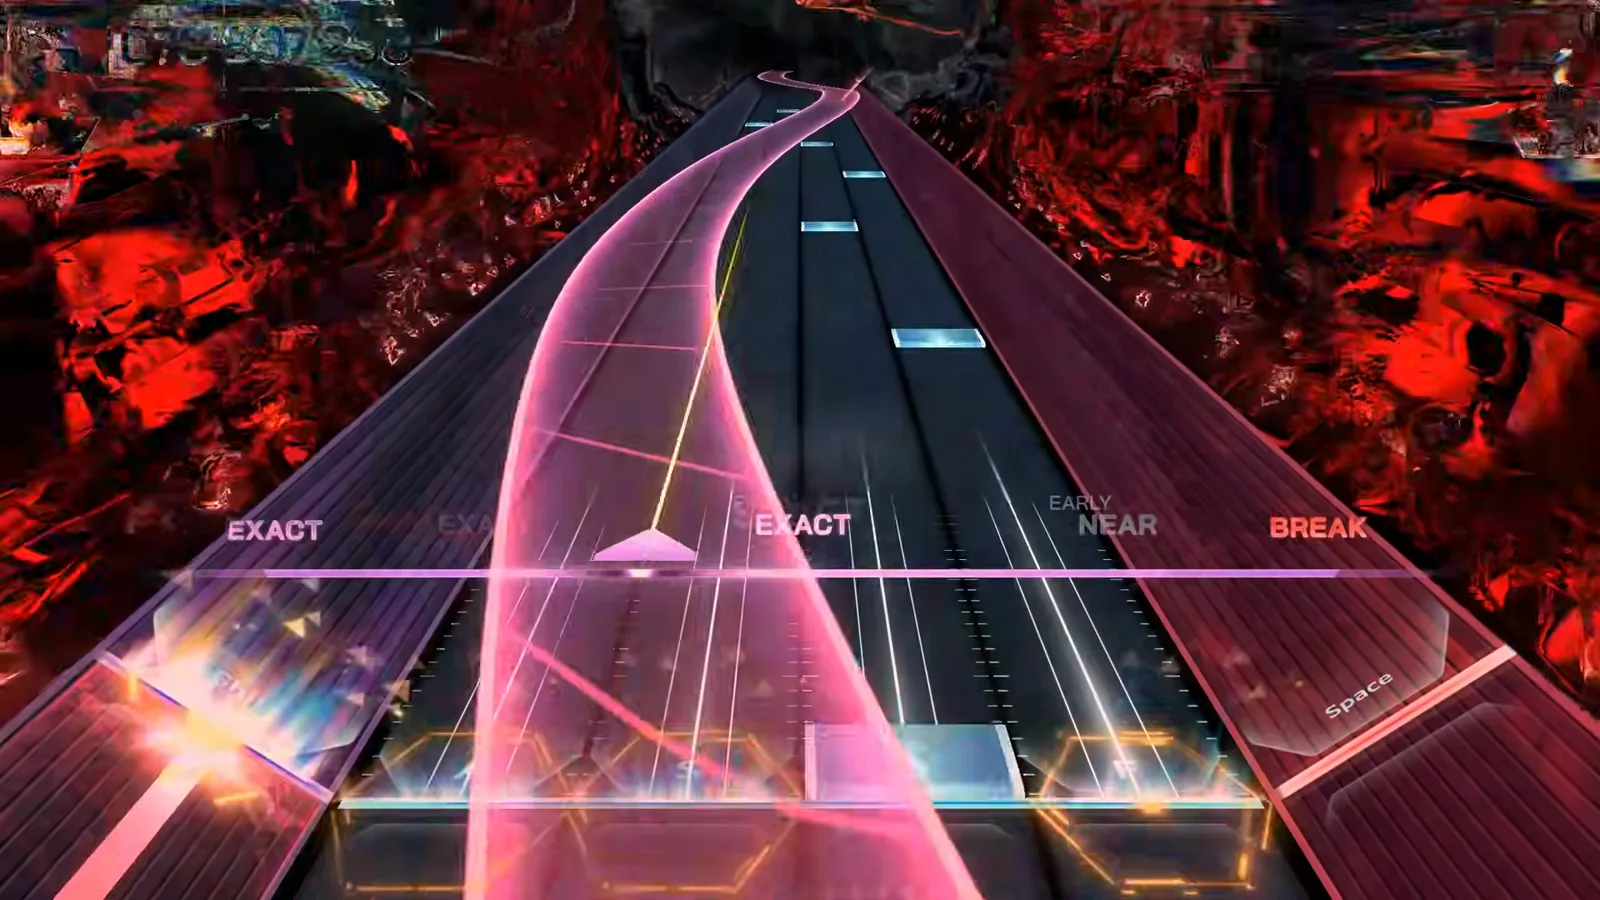
FBD 15 ATTEMPT · 2:25 THE WALL · Seol — '▓' FBD 15 attempt ↗ - 24
The last ten percent: mixed-pattern density
Flick arrows, lane taps and Field notes land in the same bars here, and the judgment row shows every verdict at once — EXACT, NEAR, LATE and BREAK in a single screen. The run died moments later at MISS GAUGE -14, rank C, with the largest judgment count the site has documented: 3,108.
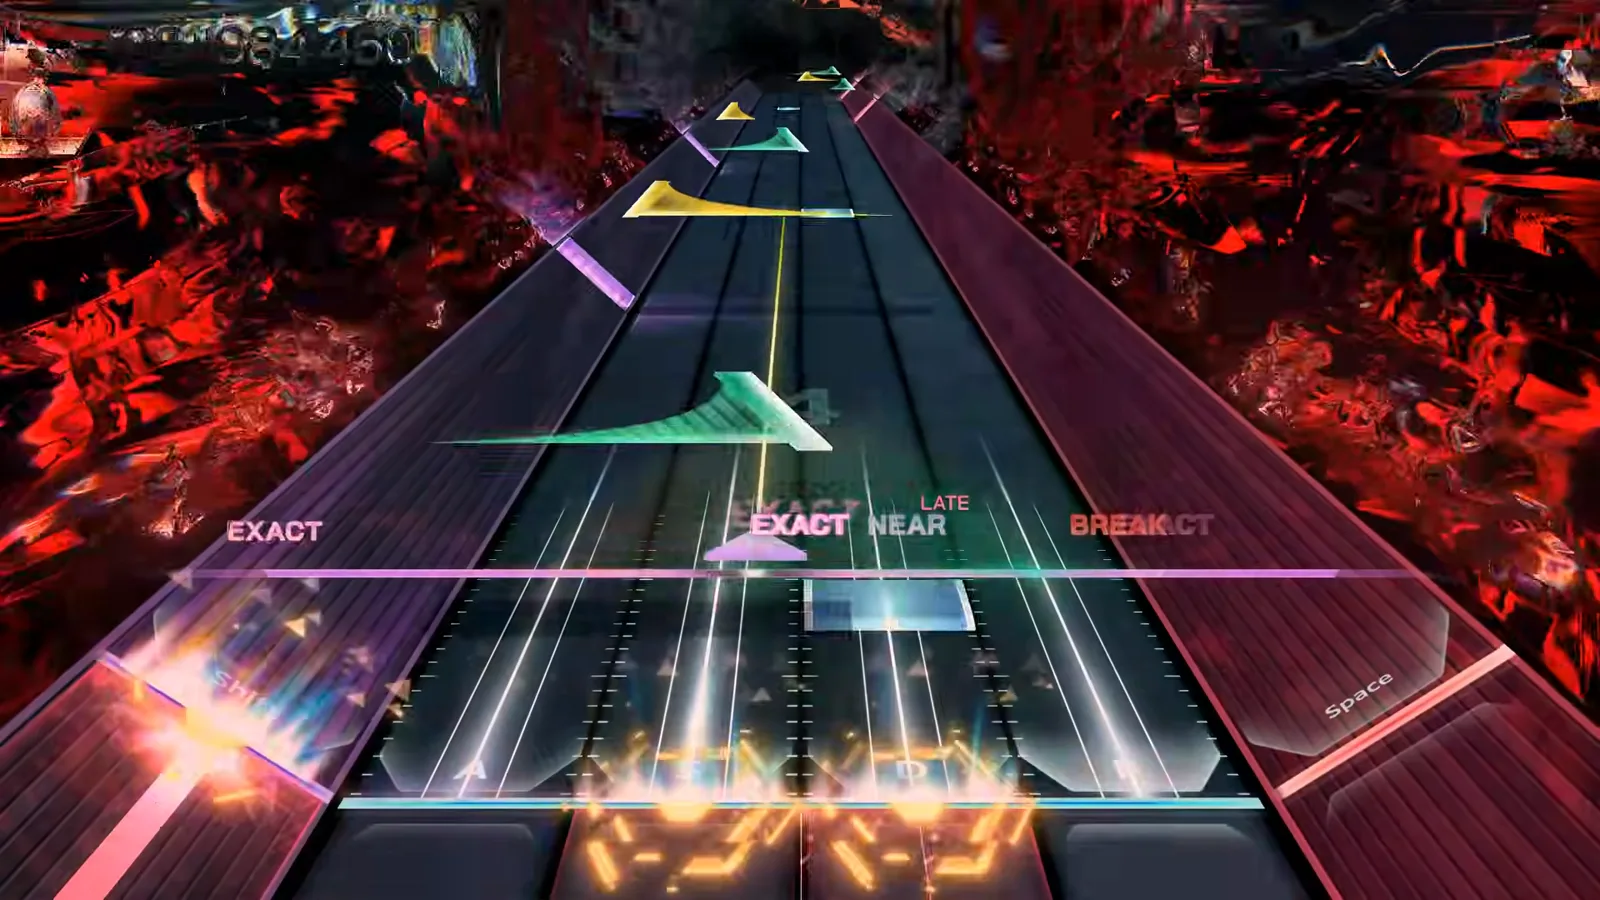
FBD 15 ATTEMPT · 2:32 DENSITY PEAK · Seol — '▓' FBD 15 attempt ↗
FAQ
Common questions about In Falsus's hardest chartsWhat is the hardest song in In Falsus?
The hidden Arc 4 song '▓' tops the game at FBD 15, with five charts at FBD 14 (Chronophobia, code:Leviathan, Hollow, PhylaXron, TACTOM) just above the fourteen-chart FBD 13 tier — Enigma, Latent Duality and Mémoire among them. The two new top sections above cover FBD 14 and FBD 15 frame by frame; twenty-four charts share level 12 below, and the demo's à la mode at FBD 11 sits further down still.
Is Ordirehv harder than à la mode?
They test different skills. Ordirehv FBD 10 is a cursor-control exam — up to four simultaneous Field ribbons with simple lanes underneath. à la mode FBD 11 adds heavier lane streams and flick-plus-Field layering on top, which is why it carries the higher level. Players strong on the mouse hand often find Ordirehv more comfortable despite both being FBD.
Has anyone Perfect Dived these charts?
Yes — all three on camera. ChepFrosty's Ghost Ray ULT run ends in a Perfect Dive (0 NEAR, 0 BREAK), EKRuby has a Perfect Dive of Ordirehv FBD 10, and BlueDiamond091 has a Perfect Dive of à la mode FBD 11 (Max-58). All four runs are linked from the source section above.
Are these demo charts the same in the full game?
Chart levels carried over unchanged where they existed — Ordirehv 1/4/8/10, à la mode 1/5/9/11, Ghost Ray 1/4/8/10, verified against the community wiki's song list. What changed is the locked fourth tier: the full game added FBD charts up to level 13, including new FBD charts for Hyaloüyne and Deep Into The Vibe.
How many FBD 12 charts are in In Falsus?
Twenty-four: the launch-era thirteen — Sin Utopia and Greyscale City (Arc 2), ZFC (Arc 1), Be There, Cyaegha and MIRINAE (base game), Cylin and Lights Out (Arc 2.5), My Deadly Sins, Self-confrontatioN and yggthrasir (Arc 3), plus demo veterans Hyaloüyne and Deep Into The Vibe — joined by eleven more documented with the complete tracklist: Albedo, Falsequre, Shadows of Unknown, Destr0yer, EXCEED MIND LIMIT, Live Fast Die Young, Noct Idea, Now I know, Outer Justice, Scarlet Espada and Trajectory of Hope. Fourteen FBD 13 charts stand above the tier.